You publish a new blog post or a product page, wait a few days and then search for it on Google. Nothing. It is simply not there. Frustrating, right?
This is one of the most common problems website owners face, and it almost always comes down to Google not indexing the page properly. The good news? Once you know what to look for, you can fix indexing issues without needing to be a technical SEO expert.
In this guide, we will walk you through exactly how to fix indexing issues in Google step by step — using Google Search Console and a few other free tools. Whether you are running a small blog or a large e-commerce site, these fixes apply to you.
What Does Google Indexing Actually Mean?

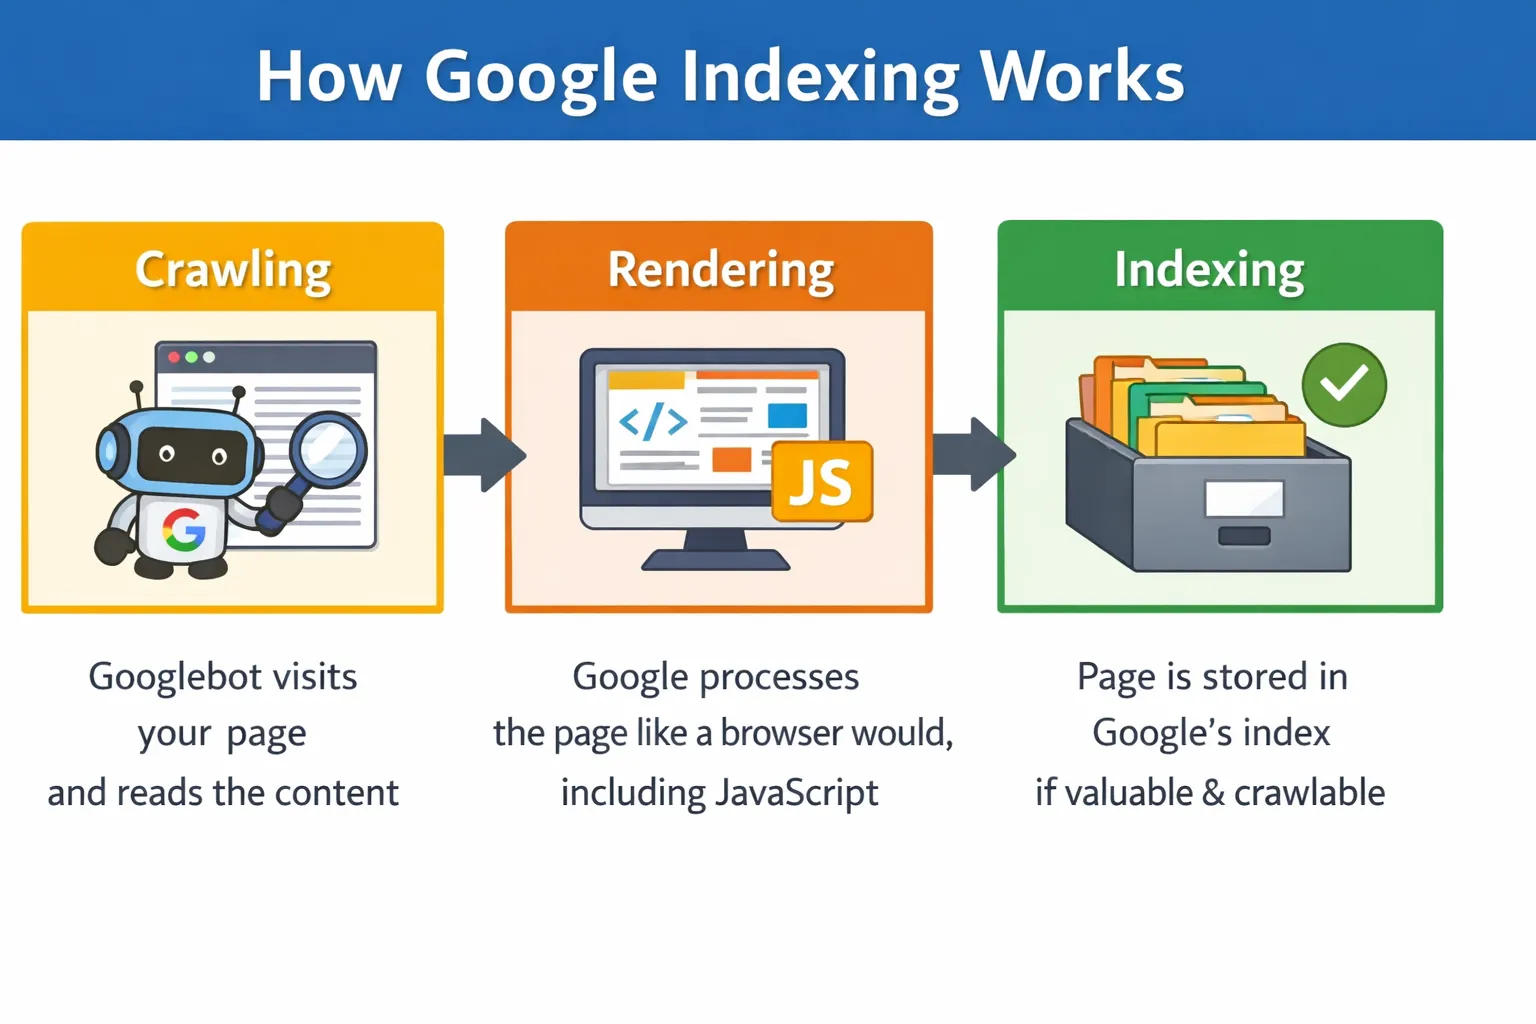
When Google discovers a new page, it goes through three stages:
- Crawling: Googlebot visits your page and reads the content
- Rendering: Google processes the page like a browser would, including JavaScript
- Indexing: If Google finds the page valuable and crawlable, it stores it in its index — the giant database it searches through when someone types a query
If a page is not in Google’s index, it simply does not exist in search results. No matter how good your content is, nobody will find it through Google until it is indexed.
Key difference: Crawling means Google visited your page. Indexing means Google actually saved it. A page can be crawled but still not indexed.
How to Check If Your Pages Are Indexed
Before fixing anything, you need to know which pages have the problem. Here are three quick ways to check:
Method 1: The site: Search Command
Open Google and type site:yourdomain.com in the search bar. Google will show all the pages it has indexed from your site. If a specific page is missing, it is not indexed.
Method 2: Google Search Console Page Indexing Report
This is the most detailed method. In Google Search Console, go to Indexing > Pages. You will see a breakdown of all your URLs sorted by status:
- Indexed: Great, these pages are in Google’s database
- Not indexed: These pages are being excluded and Google will tell you why
- Excluded: Intentionally or accidentally left out
Method 3: URL Inspection Tool
If you want to check a single page, paste its URL into the URL Inspection Tool at the top of Search Console. It will tell you the exact indexing status, when Googlebot last crawled it, and whether any issues were found.
Common Reasons Why Pages Are Not Getting Indexed
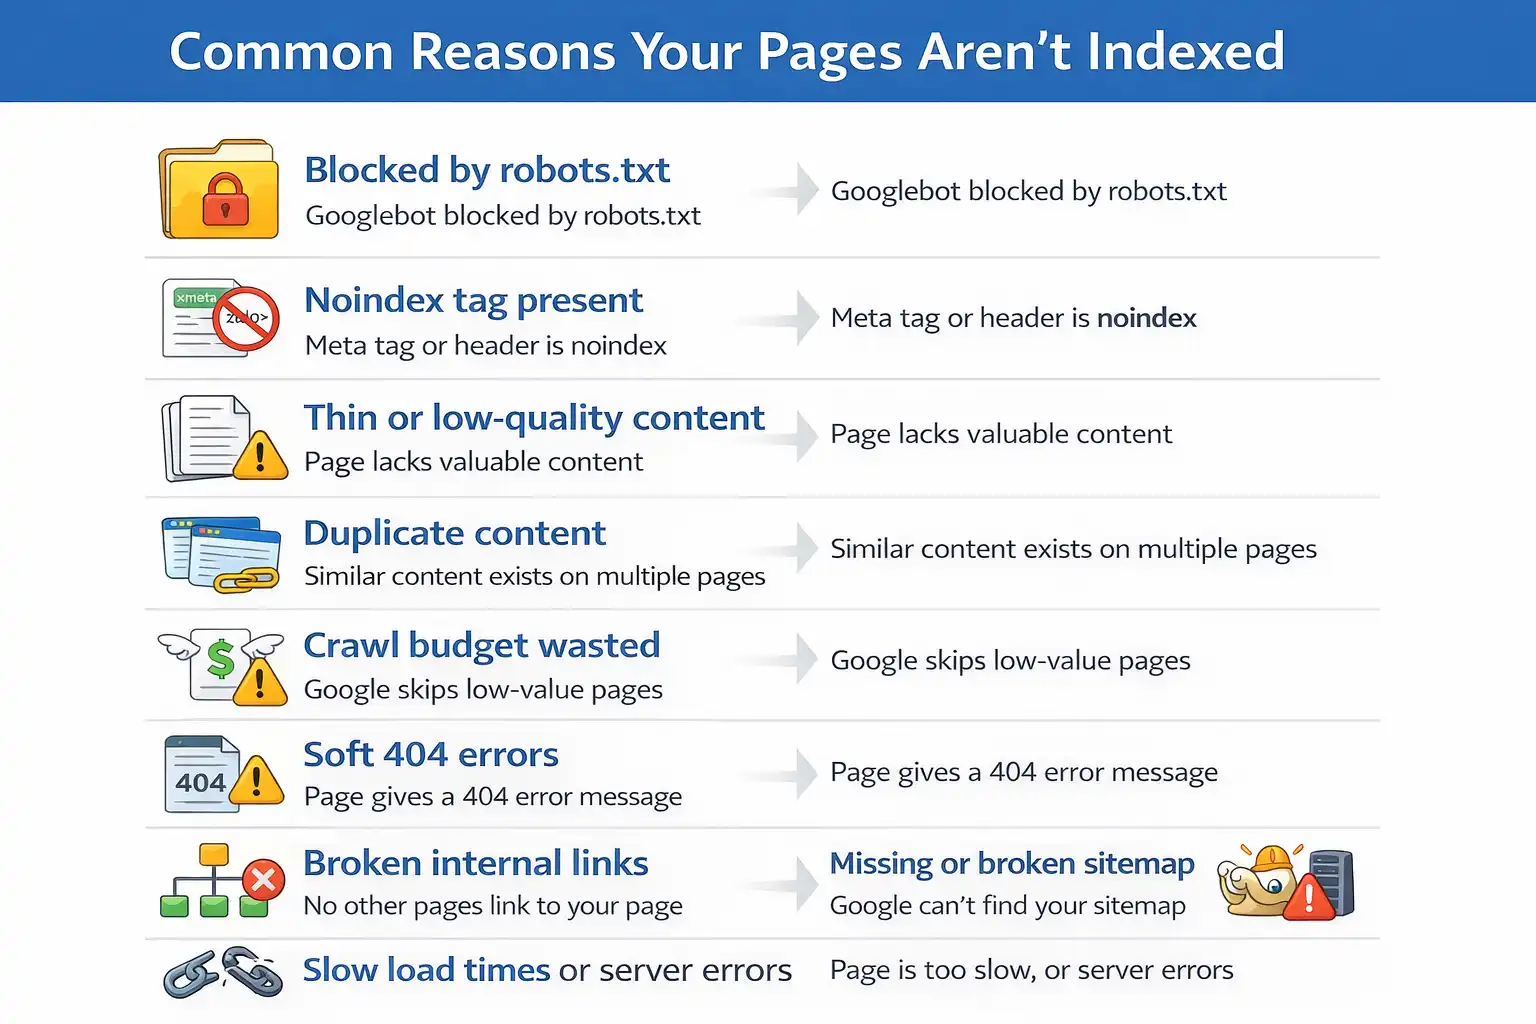
Google lists dozens of reasons why a page might not be indexed. Here are the most common ones you will run into:
- Blocked by robots.txt — You accidentally told Googlebot not to visit the page
- Noindex tag present — A meta tag or HTTP header is explicitly telling Google not to index the page
- Thin or low-quality content — Google does not find the page worth indexing
- Duplicate content — Google chooses one version of a page and ignores the rest
- Crawl budget wasted — For large sites, Google may skip low-value pages
- Soft 404 errors — The page returns a 200 OK status but has no real content
- Broken internal links — If no other page links to yours, Google might never find it
- Missing or broken sitemap — Google does not know the page exists
- Slow load times or server errors — Google gives up crawling if your site is too slow
How to Fix Indexing Issues in Google — Step by Step
Let us go through each fix in order. Start from Step 1 and work your way down — most issues are caught in the first three steps.
Step 1: Check the Page Indexing Report in Google Search Console
This is your starting point every single time. Open Google Search Console and navigate to Indexing > Pages. Scroll down to the section called ‘Why pages are not indexed’ — this table lists every reason Google is excluding your URLs.
Click on any reason to see the exact list of affected URLs. Common labels include ‘Crawled — currently not indexed’, ‘Duplicate without user-selected canonical’, and ‘Blocked by robots.txt’. Each of these points to a specific fix.
Step 2: Use the URL Inspection Tool
Once you know which pages are affected, inspect each one with the URL Inspection Tool. Paste the page URL into the search bar at the top of Search Console and press Enter.
This tool will tell you:
- Whether the URL is indexed or not
- The last time Googlebot crawled it
- Whether any noindex tags or robots blocks were found
- How Google renders the page — including any JavaScript issues
Always click ‘Test Live URL’ before requesting indexing. This checks the current live version of your page, not the cached version Google has stored.
Step 3: Fix robots.txt Blocking Issues
Visit yourdomain.com/robots.txt in your browser to see your current robots.txt file. Look for any Disallow rules that might be blocking your important pages.
A common mistake is accidentally blocking entire sections of a site. For example:
Disallow: /blog/
This single line would prevent Google from indexing every page inside your /blog/ folder. Simply removing or correcting that line fixes the issue.
Also make sure you are not blocking CSS or JavaScript files that Google needs to properly render your pages. If Google cannot load your site’s scripts, it may not understand the content properly.
Important: After editing robots.txt, go back to Search Console and use the robots.txt Tester to verify your changes are correct before saving.
Step 4: Remove or Fix Noindex Tags
A noindex tag explicitly tells Google not to index a page. The problem is that these tags sometimes get added by mistake — especially when pages are set to ‘draft’ or ‘private’ in a CMS and then published without removing the tag.
Here is where noindex tags can hide:
- In the HTML head: <meta name=’robots’ content=’noindex’>
- In the HTTP response headers
- In your SEO plugin settings (Yoast, RankMath, etc.)
- In your CMS page settings (WordPress, Shopify, Wix)
Check each of these places for the affected pages. In Yoast SEO, you can check under the Advanced tab of each post or page. Once you remove the noindex tag and save, the page becomes eligible for indexing again.
Step 5: Submit or Update Your XML Sitemap
Your XML sitemap is essentially a roadmap that tells Google about every important page on your site. If your sitemap is outdated, missing, or broken, Google may simply not know about your new pages.
Here is what to do:
- Generate or update your sitemap using a tool like Yoast SEO, Screaming Frog, or Google XML Sitemaps plugin
- Make sure the sitemap only includes pages you actually want indexed — remove low-quality pages, tag archives, and pagination if necessary
- Submit it in Google Search Console by going to Indexing > Sitemaps and entering your sitemap URL (usually yourdomain.com/sitemap.xml)
- Check the sitemap report for any errors and fix them
Step 6: Fix Duplicate Content and Canonicalization Issues
If you have multiple pages with similar or identical content, Google will pick one version to index and ignore the rest. This is called canonicalization, and getting it wrong is one of the most overlooked indexing problems.
The fix is to use canonical tags. A canonical tag tells Google which version of a page is the ‘original’ that should be indexed. Add this to the HTML head of all duplicate or similar pages:
<link rel=”canonical” href=”https://yourdomain.com/original-page/” />
Use tools like Screaming Frog or Semrush to identify duplicate content across your site. Also check that your CMS is not creating duplicate URLs with parameters, trailing slashes, or uppercase/lowercase variations.
Step 7: Improve Thin or Low-Quality Content
Google will not index a page if it does not think the content provides value to users. If your page has very little text, is full of boilerplate copy, or duplicates content found elsewhere, Google may simply ignore it.
Here is how to strengthen thin content:
- Add more depth — cover the topic thoroughly and answer real user questions
- Include original insights, data, or examples that are not found elsewhere
- Add images, videos, or infographics to make the page more useful
- Use internal links from high-authority pages on your site to push value toward the page
- Update old content with fresh information — Google favors recently updated pages
Step 8: Fix Soft 404 Errors
A soft 404 happens when a page returns an HTTP 200 (OK) status but the content is essentially empty or useless. Common examples include out-of-stock product pages with no information, expired event pages, or empty category pages.
Google treats these as low-quality pages and often skips them. Here is how to fix them:
- If the page is permanently gone: return a proper 404 or 410 status code
- If the page has moved: set up a 301 redirect to the most relevant active page
- If it is a product page: add content like related products, FAQs, or a ‘notify me’ form to make it useful
Check your Page Indexing Report in Search Console — soft 404s are listed as a separate category there.
Step 9: Request Indexing Manually
Once you have made your fixes, you do not have to wait for Google to come back on its own. You can request indexing directly through the URL Inspection Tool.
Here is how to do it properly:
- Open the URL Inspection Tool in Search Console
- Paste the URL of the fixed page
- Click ‘Test Live URL’ first to make sure everything looks good
- Click ‘Request Indexing’ — Google will add it to the crawl queue
Important: This only works for individual pages. Do not use it as a bulk fix for hundreds of URLs — it will not speed things up. For large sites, fixing technical issues and improving internal linking is more effective.
Step 10: Validate Your Fix in Search Console
For any error shown in the Page Indexing Report, Search Console gives you a ‘Validate Fix’ button once you have resolved the issue. This is the final step.
Click ‘Validate Fix’ after resolving an error type. Google will begin re-crawling the affected URLs and check whether the issue is actually resolved. You will receive an email update when the validation passes or fails.
The validation process can take anywhere from a few days to a few weeks depending on the number of URLs involved. Be patient, and check back regularly.
Pro Tips to Prevent Indexing Issues in the Future
Fixing problems is important — but stopping them from happening in the first place saves you a lot of stress. Here are some habits worth building:
- Run a monthly audit of your Page Indexing Report in Search Console — catch issues before they affect traffic
- Use tools like Screaming Frog, Semrush, or Ahrefs to crawl your site regularly and spot problems early
- Keep your XML sitemap dynamic and always up to date — your CMS plugin should handle this automatically
- Be careful when staging or testing new site versions — always block staging environments in robots.txt so Google does not index them
- Monitor crawl budget if you have a large site — make sure Google is spending time on your valuable pages, not tag pages, faceted navigation, or duplicate URLs
- Set up email alerts in Google Search Console so you are notified immediately when new issues appear
Frequently Asked Questions
Q: How long does it take Google to index a page?
A: It varies. New pages on established sites can be indexed within a few hours to a couple of days. Brand new websites can take a few weeks. Submitting your sitemap and using the URL Inspection tool to request indexing can speed things up.
Q: Why is my page crawled but not indexed?
A: This is one of the most common statuses in Search Console. It usually means Google visited your page but decided not to index it — often because of thin content, duplicate content, or a canonicalization issue. Review the page quality and check for any duplicate versions.
Q: Does submitting a sitemap guarantee indexing?
A: No. A sitemap helps Google discover your pages, but indexing is still Google’s decision. Focus on having high-quality, unique content and a clean technical setup — that is what actually gets pages indexed.
Q: Can I force Google to index my page faster?
A: Not exactly. You can request indexing through the URL Inspection tool, which adds your page to Google’s crawl queue. But there is no way to force immediate indexing. Fixing technical issues and building internal links to the page tend to help more than manual requests.
Q: What is the difference between crawling and indexing?
A: Crawling means Googlebot visited your URL and read the content. Indexing means Google decided to store it in its database and show it in search results. A page can be crawled multiple times without ever being indexed if Google finds issues with it.
Conclusion
Dealing with pages that are not showing up on Google can feel like a mystery at first — but once you know where to look, the path to fixing them is usually clear.
The most important takeaway: always start with Google Search Console. The Page Indexing Report and the URL Inspection tool will tell you almost everything you need to fix indexing issues — you just have to know how to read them.
Work through the steps in this guide one by one. Check your robots.txt, noindex tags, sitemap, and content quality. Once you make a fix, validate it in Search Console and give Google a little time to re-crawl.
The more consistent you are with these checks — even when things seem fine — the fewer surprises you will deal with down the road.